
Tutorials: OpenPLX with AGX Dynamics
Learn to use OpenPLX together with AGX Dynamics through step-by-step tutorials. The page below follows the current tutorial layout under data/openplx/tutorials, with the numbered tutorials first and the advanced/ tutorials collected at the end.
Note: You will require an AGX Dynamics installation with an active license to run the simulations. Contact Algoryx for a free trial.
The direct links to open tutorials only work on Microsoft Windows when browsing the local documentation.
If an example opens in a paused state, press "E" in agxViewer to start the simulation.
Additional keybindings and arguments for agxViewer
Standard Tutorials
OpenPLX Tutorial 01 - Boxtruck Keyboard Control
Load the shared BoxTruck OpenPLX bundle from Python and inspect the keyboard-based control loop used to drive it.
Concepts
- Load a shared OpenPLX model from Python
- Initialize a viewer scene and camera
- Bind keyboard input to a simple controller
Boxtruck Controls
| Key | Action |
|---|---|
| Up Arrow | Drive forward |
| Down Arrow | Drive backward |
Not on Windows? In your AGX Dynamics installation, navigate to data/openplx/tutorials/t01-boxtruck-keyboard-control/
Tutorial 02 - Introduction to Automatic Assembly
Learn the OpenPLX SNAP workflow for automatically assembling mechanical systems from reusable parts and mate definitions.
Concepts
- Use SNAP to position parts automatically
- Assemble links and axles with MateConnectors
- Understand ambiguous assembly cases and debugging
Not on Windows? In your AGX Dynamics installation, navigate to data/openplx/tutorials/t02-Introduction-to-automatic-assembly/

OpenPLX Tutorial 03 - URDF Robot Modeling
Import a Panda robot from URDF, attach package paths for meshes, and extend the imported model with OpenPLX traits for control and assembly behavior.
Concepts
- Import URDF files directly into OpenPLX
- Resolve URDF package-relative mesh assets
- Configure reference bodies, collision filtering, and actuation traits
Not on Windows? In your AGX Dynamics installation, navigate to data/openplx/tutorials/t03-urdf-robot-modeling/
OpenPLX Tutorial 04 - Signal Interface
Add a signal interface to a BoxTruck-based scene and use it from Python for compact input/output access.
Concepts
- Expose nested scene signals through a SignalInterface
- Send driving inputs from Python
- Read output values and display them in agxViewer
Boxtruck Controls
| Key | Action |
|---|---|
| Up Arrow | Drive forward |
| Down Arrow | Drive backward |
Not on Windows? In your AGX Dynamics installation, navigate to data/openplx/tutorials/t04-signal-interface/
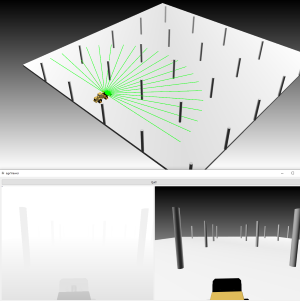
OpenPLX Tutorial 05 - Lidar Autobrake System
Extend the shared BoxTruck model with a lidar sensor and a Python autobrake controller.
Concepts
- Build and attach a lidar sensor in OpenPLX
- Configure sensor outputs
- Read lidar data and trigger automatic braking in Python
Boxtruck Controls
| Key | Action |
|---|---|
| Up Arrow | Drive forward |
| Down Arrow | Drive backward |
Not on Windows? In your AGX Dynamics installation, navigate to data/openplx/tutorials/t05-lidar-autobrake/
OpenPLX Tutorial 06 - Wheeled Vehicle Control
Control the shared VehicleWithSteering model from Python through its signal interface.
Concepts
- Load a shared wheeled-vehicle model
- Send throttle, clutch, brake, gear, and steering commands
- Bind keyboard input to a higher-level vehicle helper
Vehicle Controls
| Key | Action |
|---|---|
| Up Arrow | Drive forward |
| Down Arrow | Drive backward |
| Left Arrow | Steer left |
| Right Arrow | Steer right |
| Delete | Apply brake |
Not on Windows? In your AGX Dynamics installation, navigate to data/openplx/tutorials/t06-wheeled-vehicle-control/
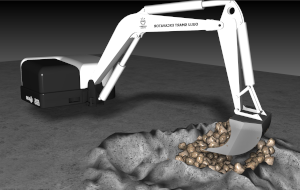
OpenPLX Tutorial 07 - Tracking an Excavator Bucket Using IMU Output
Track an excavator bucket through IMU signals and dead reckoning while operating the excavator arm from agxViewer.
Concepts
- Attach IMU sensors to an articulated mechanism
- Read sensor output queues from Python
- Estimate bucket position from inertial measurements
Excavator Controls
| Key | Action |
|---|---|
| Up Arrow | Raise the boom |
| Down Arrow | Lower the boom |
| Right Arrow | Move the stick outward |
| Left Arrow | Move the stick inward |
| Home | Rotate the bucket one way |
| End | Rotate the bucket the other way |
Not on Windows? In your AGX Dynamics installation, navigate to data/openplx/tutorials/t07-imu/
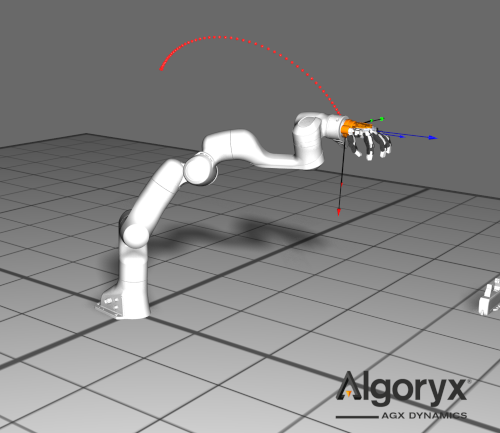
OpenPLX Tutorial 08 - URDF Robot Control
Build a computed-torque controller for the shared Panda models created in the URDF modeling tutorial.
Concepts
- Load Panda scene variants from Python
- Read joint states and resolve signal paths
- Apply inverse kinematics and computed-torque control
Not on Windows? In your AGX Dynamics installation, navigate to data/openplx/tutorials/t08-urdf-robot-control/
OpenPLX Tutorial 09 - Camera Based Steering
Mount an RGB camera on the shared vehicle model and steer the vehicle toward a tracked object using the camera output in Python.
Concepts
- Build and configure a camera sensor in OpenPLX
- Read RGB measurements in Python
- Combine perception with vehicle control
Vehicle Controls
| Key | Action |
|---|---|
| Up Arrow | Drive forward |
| Down Arrow | Drive backward |
| Left Arrow | Steer left |
| Right Arrow | Steer right |
| Delete | Apply brake |
Not on Windows? In your AGX Dynamics installation, navigate to data/openplx/tutorials/t09-camera-based-steering/
Advanced Tutorials
OpenPLX Advanced Tutorial 01 - Bulldozer
Import a bulldozer from an AGX file and extend it with tracks, drivetrain, terrain interaction, and blade/ripper control.
Concepts
- Work from a preexisting AGX model
- Generate track systems and drivetrain components
- Control the shovel and ripper through OpenPLX signals
Bulldozer Controls
| Key | Action |
|---|---|
| Up Arrow | Drive forward |
| Down Arrow | Drive backward |
| Insert | Brake the left track |
| Delete | Brake the right track |
| Page Up | Raise the shovel |
| Page Down | Lower the shovel |
| Home | Tilt the shovel up |
| End | Tilt the shovel down |
| Right Arrow | Raise the ripper |
| Left Arrow | Lower the ripper |
Not on Windows? In your AGX Dynamics installation, navigate to data/openplx/tutorials/advanced/ta01-bulldozer/

OpenPLX Advanced Tutorial 02 - Heavy Machine Bundle
Design a domain-specific OpenPLX bundle for heavy machinery and use it to define reusable crane system components.
Concepts
- Create a bundle rooted by config.openplx
- Organize a larger OpenPLX project into reusable files
- Build crane templates and variants for later reuse
Not on Windows? In your AGX Dynamics installation, navigate to data/openplx/tutorials/advanced/ta02-heavy-machine-bundle/
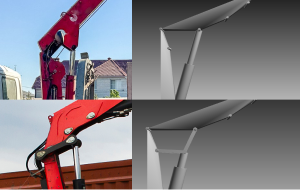
OpenPLX Advanced Tutorial 03 - Excavator Arm Using the Heavy Machine Bundle
Reuse the HeavyMachineBundle to assemble an excavator arm from reusable machine components and imported AGX bodies.
Concepts
- Reference a local OpenPLX bundle
- Compose a machine from reusable components and traits
- Drive an excavator arm through signal inputs
Excavator Controls
| Key | Action |
|---|---|
| Up Arrow | Move the boom up |
| Down Arrow | Move the boom down |
| Left Arrow | Rotate the swing left |
| Right Arrow | Rotate the swing right |
| A | Extend the stick |
| S | Retract the stick |
| , | Open the bucket |
| . | Close the bucket |
Not on Windows? In your AGX Dynamics installation, navigate to data/openplx/tutorials/advanced/ta03-excavator/