OpenPLX Tutorial 01 — Boxtruck
This tutorial will guide you through setting up a basic boxtruck simulation using OpenPLX. The goal is to introduce you to some of the core concepts of OpenPLX, including setting up rigid bodies, defining geometries, and creating interactive elements within a simulation. By the end of this tutorial, you will be familiar with the following concepts:
- Initializing an OpenPLX scene and defining a physics system
- Creating and configuring rigid bodies with specific geometries
- Attaching components with constraints
- Setting up collision properties and friction materials
- Adding visual meshes and textures
- Controlling the simulation using external input signals
This foundational setup will serve as a base for future tutorials, where we’ll expand on these basics to incorporate steering, a more realistic drivetrain, and other dynamic components.
Attached files:
- Visual meshes:
chassis.obj,wheel.obj,ground.obj. - Visual textures:
chassis.png,wheel.png,ground.png. - Final example:
boxtruck.openplx,boxtruck.py.
The files listed are available under data/openplx/tutorial/t01-boxtruck in your AGX installation.
Before You Get Started
Familiarity with the agxViewer keybindings will also enhance your experience in this tutorial. Here are some essential commands:
- 1: Reload the scene to reflect any changes in your code
- E: Play/pause the simulation
- G: Show/hide collision geometries
For a full list of viewer shortcuts, refer to the AGX Keybindings documentation.
To learn more about OpenPLX and its features, visit the OpenPLX Documentation page.
Step 1: Define the Simulation Components
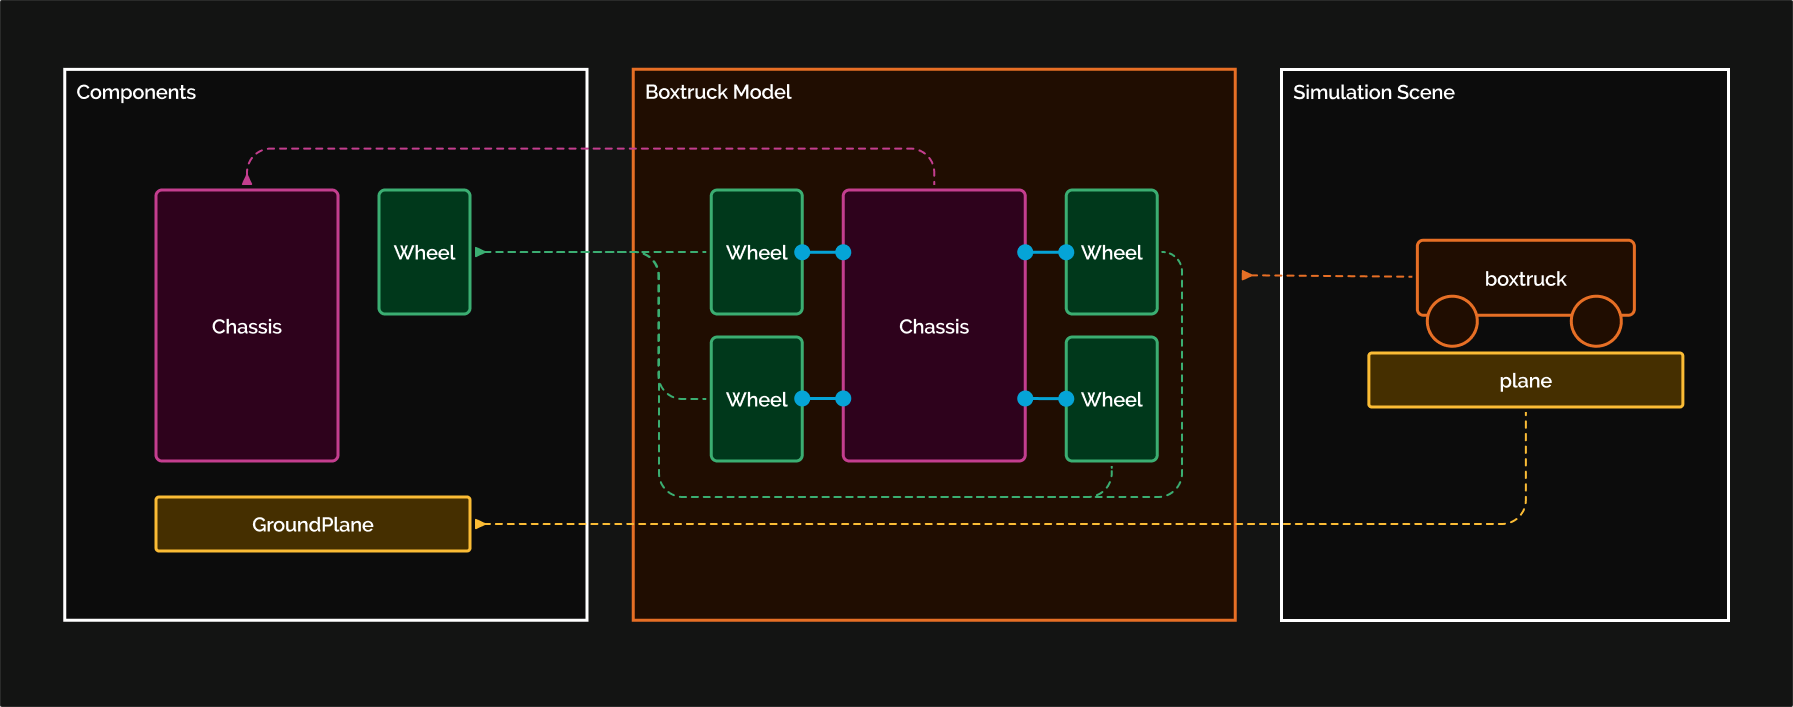
In this tutorial, we will create a scene with a simple vehicle model driving across a plane. The vehicle, which we will call boxtruck, will consist of a chassis and four wheels. The wheels will all be based on the same wheel model.
For now, the truck will have four forward-facing wheels, with motors applied to the front wheels for basic movement. Later tutorials will show you how to implement more complex controls and steering.
Step 2: Setting Up the Scene
Begin by creating a new file named boxtruck.openplx. This file will define the entire simulation scenario and should extend the Physics3D.System model. Add this line to initialize a basic scene:
Scene is Physics3D.System
As default, the viewer will always read the last definition in a file as the main scene.
To load the file, use the OpenPLX viewer tool by running the following command in your terminal:
agxViewer boxtruck.openplx
Whenever you make changes to the code, press 1 in the viewer to reload the scene with the latest version and Space to reset the viewport.
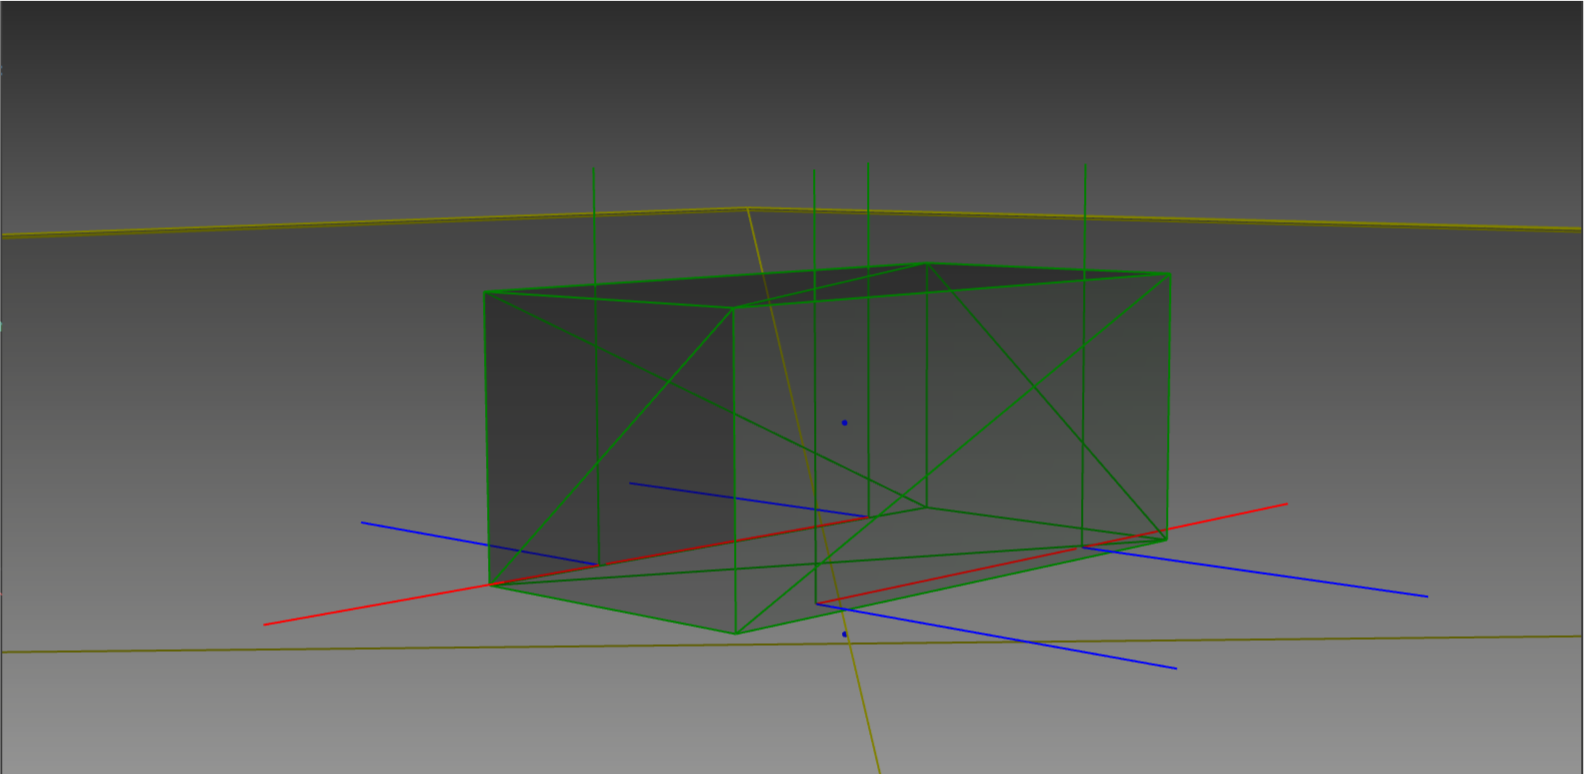
Step 3: Adding a Chassis
Now, add a basic chassis to the scene. The chassis, represented as a Rigid Body with Box Geometry, acts as the main body of the truck. Add the following code to define it:
Chassis is Physics3D.Bodies.RigidBody:
    geometry is Physics3D.Geometries.Box:
        size:
            x: 3.3
            y: 1.7
            z: 1.44
    inertia.mass: 1000

# Add the Chassis to the scene
Scene is Physics3D.System:
    chassis is Chassis
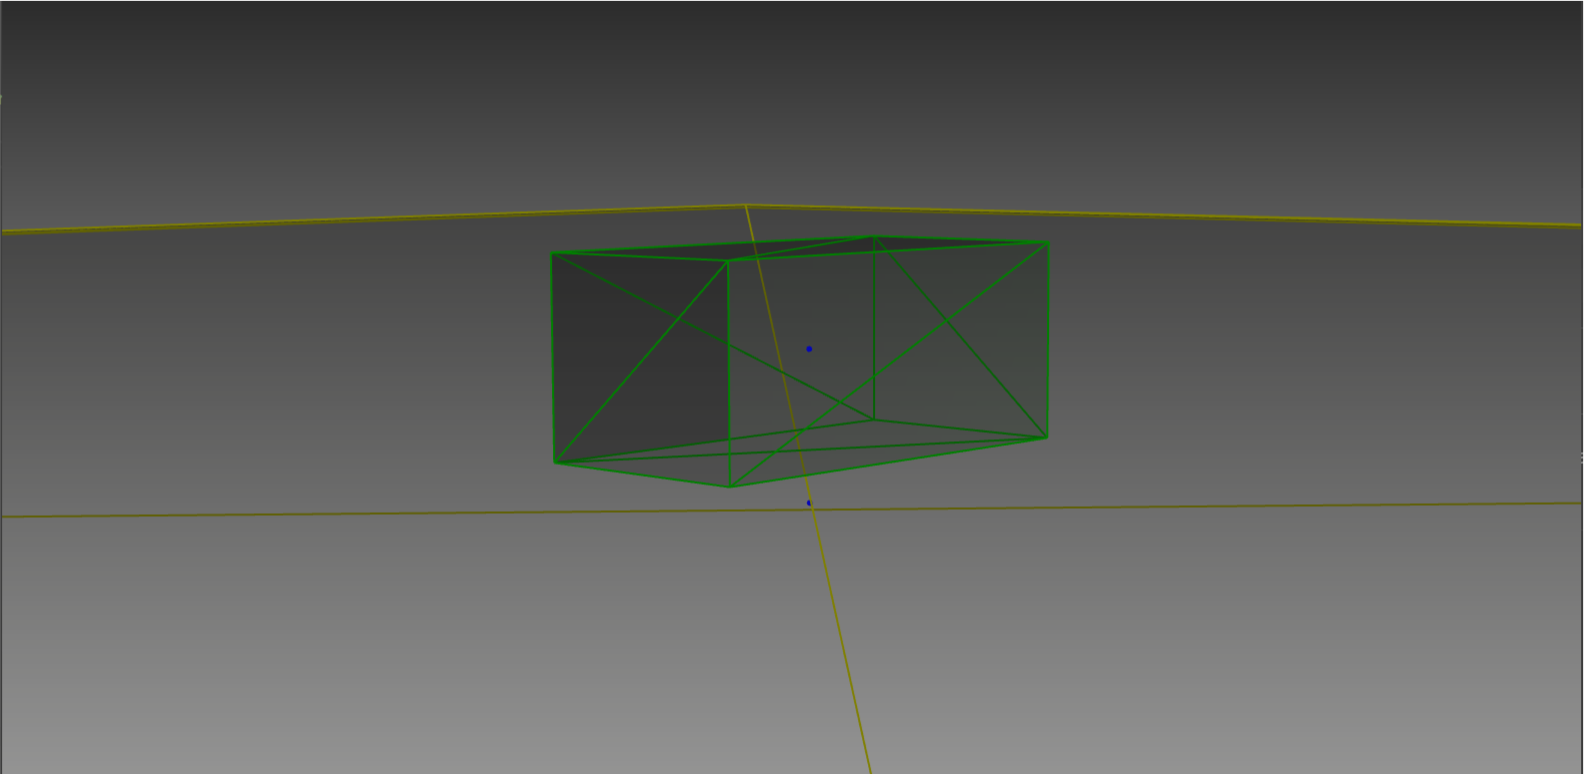
The chassis will fall down when you start the scene. Press E to play or pause the simulation.
You can modify the chassis size by adjusting the
x,y, andzvalues undergeometry.size.
If this is your first time seeing OpenPLX syntax this might be a lot to take in. It is perfectly reasonable to finish this tutorial with very little knowledge of the OpenPLX syntax, just follow the instructions and it should give you a basic understanding of the syntax. A more detailed syntax description is available in the syntax documentation.
Step 4: Adding a Ground Plane
To prevent the chassis from falling endlessly, add a static Ground Plane. This plane provides a stable surface for the truck to rest on.
#...Chassis definition...

GroundPlane is Physics3D.Bodies.RigidBody:
    geometry is Physics3D.Geometries.Box:
        size:
            x: 100
            y: 100
            z: 0.1
    is_dynamic: false  # Ground plane is static

#Add the GroundPlane to the Scene
Scene is Physics3D.System:
    chassis is Chassis:
        kinematics.local_transform.position.z: 1.1 #Position the Chassis above the plane
    ground is GroundPlane
The chassis should now land on the ground plane, which remains stationary due to the
is_dynamic: falsesetting.
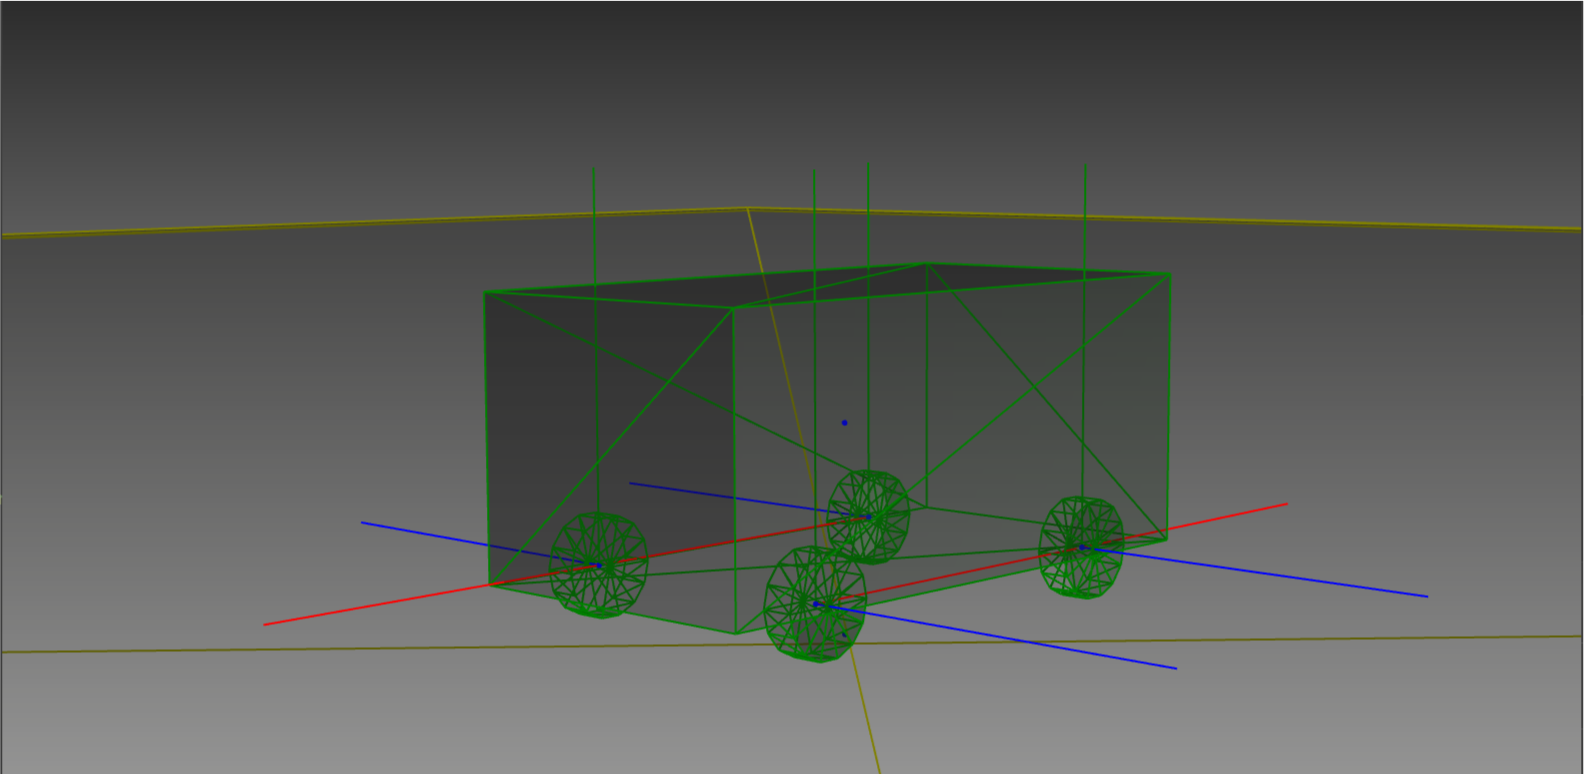
Step 5: Creating a Wheel Model
Define a Wheel model that will be reused for all four wheels.
Each wheel will have a mass, cylindrical geometry,
and a MateConnector to attach it to the chassis.
A mate connector that is declared as an attribute in a rigid body defines a relative frame on which the constraints defined by a mate acts.
Wheel is Physics3D.Bodies.RigidBody:
    geometry is Physics3D.Geometries.Cylinder:
        radius: 0.26
        height: 0.165
    inertia.mass: 10

    connector is Physics3D.Interactions.MateConnector:
        .agx_debug_render_frame: true
        main_axis: { 0, -1, 0 }
        normal: { 1, 0, 0 }
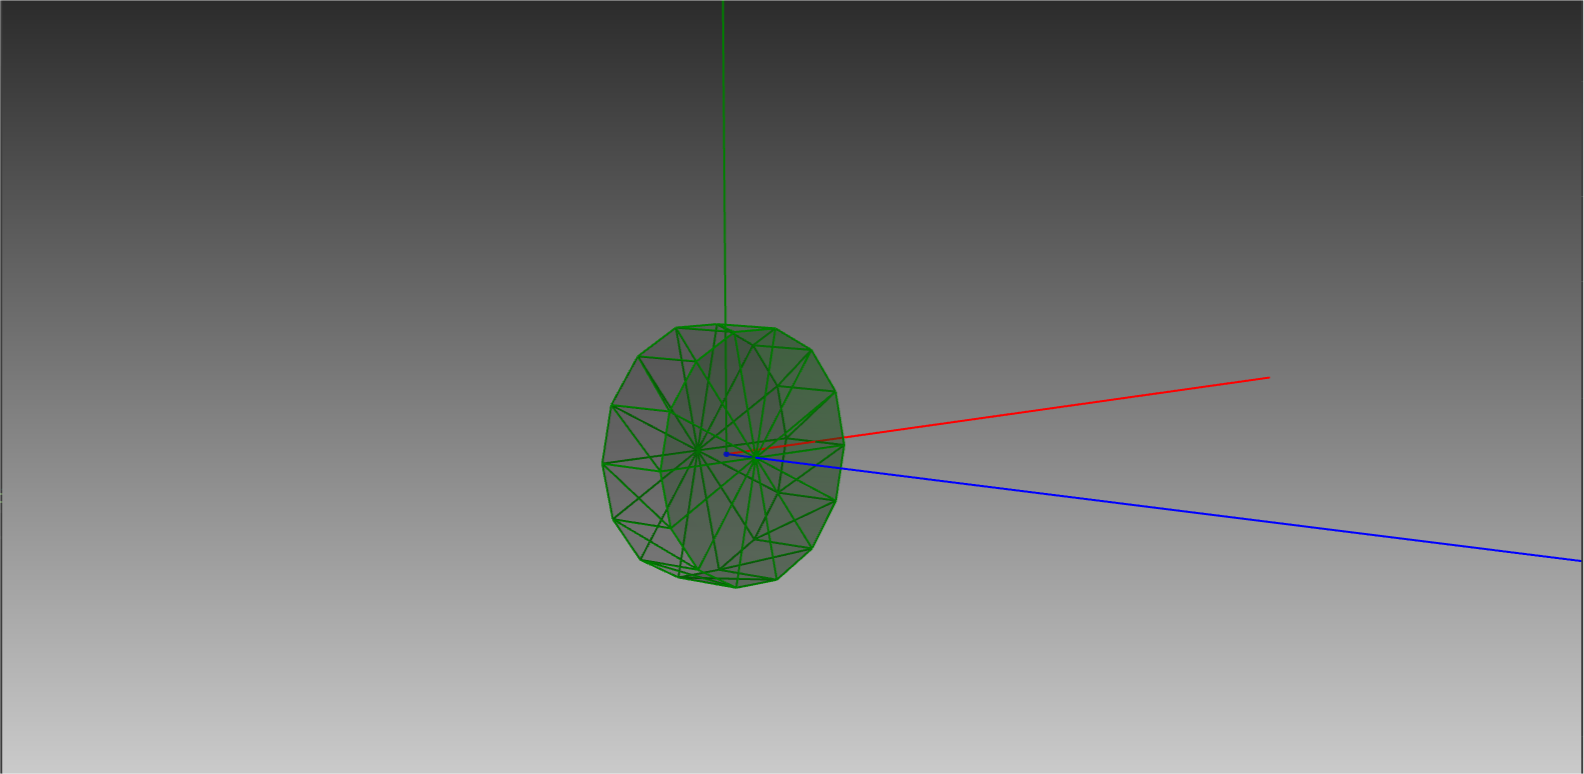
To view the wheel model alone, load it in OpenPLX with
agxViewer boxtruck.openplx --modelName Wheel -p. The-pflag starts the simulation paused, allowing you to inspect components without simulation dynamics.
In tutorial t02 - Introduction to automatic assembly you will learn more about how to model articulated systems with rigid bodies and mates using mate connectors.
The built in SNAP algorithm will automatically assemble all rigid bodies that are interacting through mates.
Step 6: Add Connectors to the Chassis
To make it possible to attach the wheels to the chassis, add four Mate Connectors where each wheel will connect.
Chassis is Physics3D.Bodies.RigidBody:
    geometry is Physics3D.Geometries.Box:
        size:
            x: 3.3
            y: 1.7
            z: 1.44
    inertia.mass: 1000
    # Connector offsets to position each wheel connector relative to chassis geometry
    connector_offsets is Math.Vec3:
        x: geometry.size.x * 0.31
        y: geometry.size.y * 0.44
        z: geometry.size.z * 0.48

    # Define connectors for each wheel, specifying positions and orientations
    front_left_connector is Physics3D.Interactions.MateConnector:
        .agx_debug_render_frame: true
        position:
            x: -connector_offsets.x
            y: -connector_offsets.y
            z: -connector_offsets.z
        main_axis: { 0, -1, 0 }
        normal: { 1, 0, 0 }

    front_right_connector is Physics3D.Interactions.MateConnector:
        .agx_debug_render_frame: true
        position:
            x: -connector_offsets.x
            y: connector_offsets.y
            z: -connector_offsets.z
        main_axis: { 0, 1, 0 }
        normal: { 1, 0, 0 }

    rear_left_connector is Physics3D.Interactions.MateConnector:
        .agx_debug_render_frame: true
        position:
            x: connector_offsets.x
            y: -connector_offsets.y
            z: -connector_offsets.z
        main_axis: { 0, -1, 0 }
        normal: { 1, 0, 0 }

    rear_right_connector is Physics3D.Interactions.MateConnector:
        .agx_debug_render_frame: true
        position:
            x: connector_offsets.x
            y: connector_offsets.y
            z: -connector_offsets.z
        main_axis: { 0, 1, 0 }
        normal: {1, 0, 0 }
These connectors ensure each wheel is correctly aligned with the chassis.
Step 7: Build the BoxTruck
Now, we are going to combine the Chassis model with four instances of the Wheel model into a new model called BoxTruck. We can combine multiple rigid bodies into a Physics3D.System, which can then be added to the Physics3D.System of the main scene.
Attach the wheels to the chassis using hinge joints, allowing each wheel to rotate freely.
BoxTruck is Physics3D.System:
    chassis is Chassis:
        kinematics.local_transform.position.z: 1.1  # Set initial height

    # Define wheel instances for each corner
    front_left_wheel is Wheel
    front_right_wheel is Wheel
    rear_left_wheel is Wheel
    rear_right_wheel is Wheel

    # Attach wheels to chassis with hinge joints
    front_left_hinge_joint is Physics3D.Interactions.Hinge:
        connectors: [chassis.front_left_connector, front_left_wheel.connector]
    front_right_hinge_joint is Physics3D.Interactions.Hinge:
        connectors: [chassis.front_right_connector, front_right_wheel.connector]

    rear_left_hinge_joint is Physics3D.Interactions.Hinge:
        connectors: [chassis.rear_left_connector, rear_left_wheel.connector]
    rear_right_hinge_joint is Physics3D.Interactions.Hinge:
        connectors: [chassis.rear_right_connector, rear_right_wheel.connector]
In your scene, replace the Chassis with the complete BoxTruck model.
Scene is Physics3D.System:
    boxTruck is BoxTruck
    ground is GroundPlane
Reload the simulation and confirm that the wheels are attached to the chassis.
Step 8: Disable Collisions Between Chassis and Wheels
Prevent unintended collisions between the wheels and the chassis by using a CollisionGroup and DisableCollisionPair.
BoxTruck is Physics3D.System:
    #... Previous BoxTruck defintion...

    chassis_wheels_collision_group is Simulation.CollisionGroup:
        bodies: [chassis, front_left_wheel, front_right_wheel, rear_left_wheel, rear_right_wheel]

    disable_wheel_chassis_collisions is Simulation.DisableCollisionPair:
        group1: chassis_wheels_collision_group
        group2: chassis_wheels_collision_group
Disabling these collisions avoids simulation issues, as the wheels and chassis are part of the same assembly.
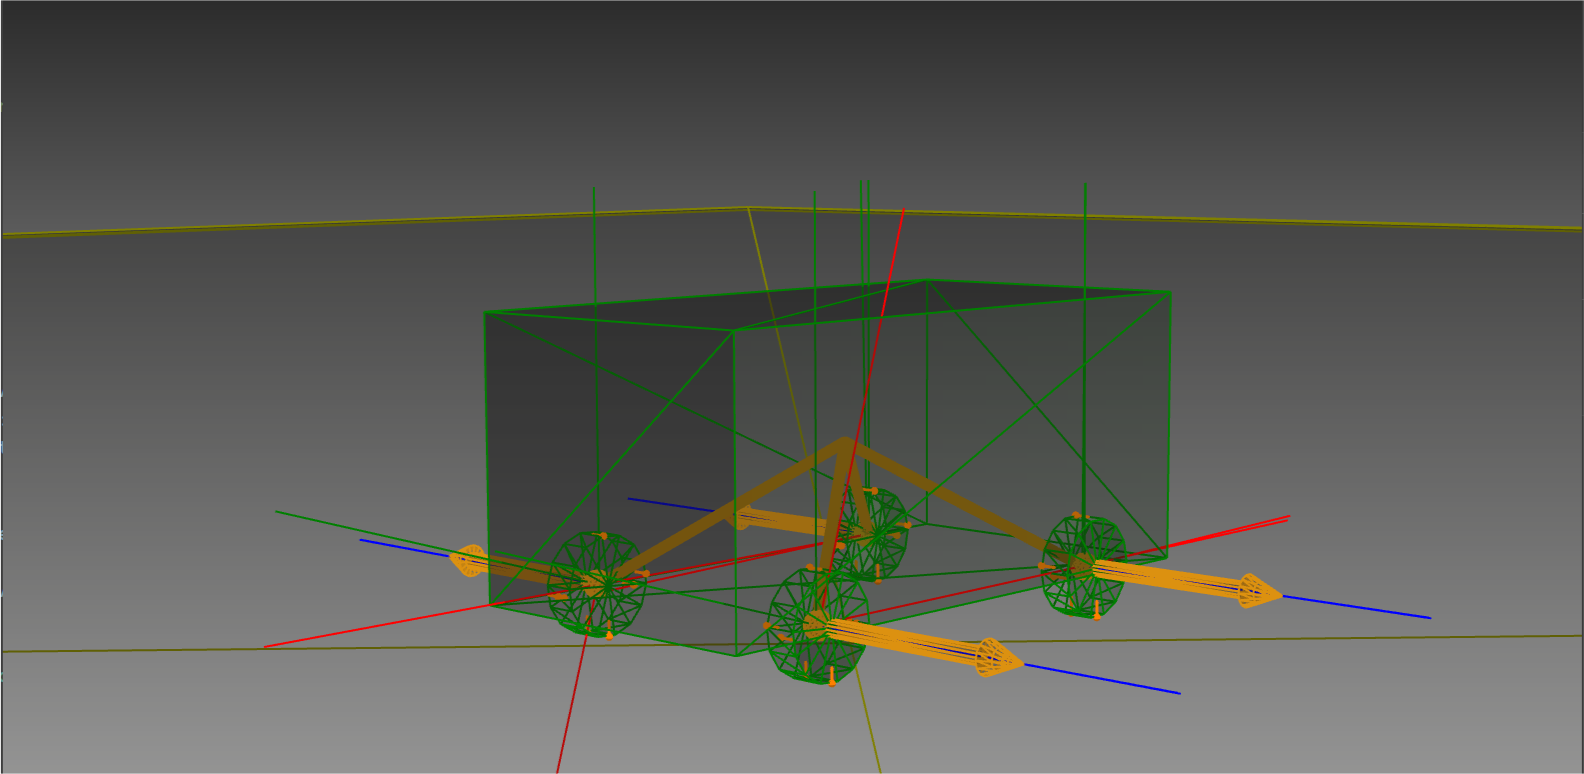
Step 9: Add Motors
Attach a Motor to each of the front wheels to provide forward motion. These motors will drive the front wheels at a set speed.
BoxTruck is Physics3D.System:
    #... Previous BoxTruck definition...

    # Define drive motors to apply rotation to front wheels
    front_left_drive_motor is Physics3D.Interactions.RotationalVelocityMotor:
        connectors: front_left_hinge_joint.connectors
        target_speed: 1  # Speed for left wheel

    front_right_drive_motor is Physics3D.Interactions.RotationalVelocityMotor:
        connectors: front_right_hinge_joint.connectors
        target_speed: 1  # Speed for right wheel
The motors will rotate the front wheels at a constant speed. Later, you can adjust the speed dynamically using input controls.
Step 10: Add Friction Materials
Define Materials and a Surface Contact Model between the wheels and the ground to improve grip, making the simulation more realistic by reducing slip.
Wheel Material:
const WheelMaterial is Physics.Geometries.Material:
    unique_name: "Tutorial01_BoxTruck_WheelContactMaterial"
    density: 1000
Ground Material:
const GroundMaterial is Physics.Geometries.Material:
    unique_name: "Tutorial01_BoxTruck_GroundMaterial"
    density: 10
Surface Contact Model between Wheel and Ground:
# Define friction model between wheels and ground for realistic interactions
WheelGroundFrictionModel is Physics.Interactions.SurfaceContact.Model:
    material_1: WheelMaterial
    material_2: GroundMaterial
    tangential_restitution: 0.0
    normal_restitution: 0.0
    friction becomes Physics.Interactions.Dissipation.DryConstantNormalForceFriction:
        normal_force: 1000
        coefficient: 1.0
Assign these materials to the wheel and ground geometries and attach the friction model.
Assign the Wheel Material:
Wheel is Physics3D.Bodies.RigidBody:
    geometry is Physics3D.Geometries.Cylinder:
        radius: 0.26
        height: 0.165
        material: WheelMaterial

    #...Rest of Wheel Definition...
Assign the Ground Material:
GroundPlane is Physics3D.Bodies.RigidBody:
    geometry is Physics3D.Geometries.Box:
        size:
            x: 100
            y: 100
            z: 0.1
        material: GroundMaterial
    is_dynamic: false  # Ground plane is static
Add the Surface Contact Model to the Scene:
Scene is Physics3D.System:
    boxTruck is BoxTruck
    ground is GroundPlane

    wheel_ground_friction is WheelGroundFrictionModel
These friction materials help the truck handle better on the ground surface. You can try modifying the friction model parameters further.
Materials are prefixed with the
constkeyword making them global in scope, read more here Const models. The surface contact models however are tied to a specificPhysics3D.System.
Step 11: Set Up Controls
To control the truck using keyboard inputs, create a Python script called boxtruck.py that interacts with the OpenPLX signaling system.
The signals for the wheel motors are already defined in the RotationalVelocityMotors. You can access them through "boxTruck.front_left_drive_motor.target_angular_velocity_input" and vice versa.
Use the provided Python script to add forward and backward control for the truck:
"""
Controller script for boxtruck.openplx
"""
import os
from agxPythonModules.utils.environment import init_app, application, root
from agxPythonModules.utils.callbacks import KeyboardCallback
import openplx
from openplx.Physics.Signals import RealInputSignal
import agx
import agxOSG
import agxSDK

# Class to manage boxtruck maneuvering using input signals
class BoxTruckManeuvering:

    def __init__(self, input_queue, front_left_motor_velocity_input: openplx.Physics.Signals.Input,
                 front_right_motor_velocity_input: openplx.Physics.Signals.Input):
        """
        Initialize the boxtruck maneuvering class with input signals for motor control.

        :param input_queue: Queue to send signals to the simulation
        :param front_left_motor_velocity_input: Input signal for the front left motor
        :param front_right_motor_velocity_input: Input signal for the front right motor
        """
        super().__init__()
        self.input_queue = input_queue
        self.front_left_motor_velocity_input = front_left_motor_velocity_input
        self.front_right_motor_velocity_input = front_right_motor_velocity_input
        self.target_velocity = 0  # Default target velocity
        self.amplitude = 3  # Speed amplitude for the motors

    def send_signals(self):
        """
        Send motor velocity signals to the input queue.
        """
        # Forward signal for the left motor
        self.input_queue.send(
            RealInputSignal.create(
                self.target_velocity, self.front_left_motor_velocity_input))
        # Reverse signal for the right motor
        self.input_queue.send(
            RealInputSignal.create(
                -self.target_velocity, self.front_right_motor_velocity_input))

    def forward(self):
        """
        Set target velocity for forward movement and send signals.
        """
        self.target_velocity = self.amplitude
        self.send_signals()

    def backward(self):
        """
        Set target velocity for backward movement and send signals.
        """
        self.target_velocity = -self.amplitude
        self.send_signals()

    def stop(self):
        """
        Stop the vehicle by setting the target velocity to zero.
        """
        self.target_velocity = 0
        self.send_signals()

    def handle_forward(self, key) -> bool:
        """
        Handle forward key press/release events.

        :param key: Key event object
        :return: True if key handling was successful
        """
        if key.down:
            self.forward()  # Move forward on key press
        else:
            self.stop()  # Stop on key release

    def handle_backward(self, key) -> bool:
        """
        Handle backward key press/release events.

        :param key: Key event object
        :return: True if key handling was successful
        """
        if key.down:
            self.backward()  # Move backward on key press
        else:
            self.stop()  # Stop on key release

    def setup_keyboard_listener(self):
        """
        Set up keyboard listeners for forward and backward controls.
        """
        KeyboardCallback.bind(name="forward", key=agxSDK.GuiEventListener.KEY_Up, callback=self.handle_forward)
        KeyboardCallback.bind(name="backward", key=agxSDK.GuiEventListener.KEY_Down, callback=self.handle_backward)

def initialize_scene_decorator():
    camera_data = application().getCameraData()
    camera_data.eye = agx.Vec3(-12.8402, 18.6618, 5.0588)
    camera_data.center = agx.Vec3(1.0282, -0.5451, 2.0728)
    camera_data.up = agx.Vec3(0.0, 0.0, 0.9917)
    camera_data.nearClippingPlane = 0.01
    camera_data.farClippingPlane = 500
    application().applyCameraData(camera_data)
    application().getSceneDecorator().setEnableShadows(True)
    application().getSceneDecorator().setShadowMethod(
        agxOSG.SceneDecorator.SOFT_SHADOWMAP
    )
    application().getSceneDecorator().setEnableShaderState(True)

    application().getSceneDecorator().setEnableCalculateLightPositions(agxOSG.SceneDecorator.LIGHT0, False)
    application().getSceneDecorator().setEnableCalculateLightPositions(agxOSG.SceneDecorator.LIGHT1, False)
    application().getSceneDecorator().setEnableCalculateLightPositions(agxOSG.SceneDecorator.LIGHT2, False)

    application().getSceneDecorator().getLightSource(agxOSG.SceneDecorator.LIGHT0).setPosition(agx.Vec4(10, 10, 10, 1))
    application().getSceneDecorator().getLightSource(agxOSG.SceneDecorator.LIGHT1).setPosition(agx.Vec4(-10, 10, 10, 1))
    application().getSceneDecorator().getLightSource(agxOSG.SceneDecorator.LIGHT2).setPosition(agx.Vec4(10, 19, 10, 1))

# Function to build the simulation scene
def buildScene(): # pylint: disable=invalid-name
    """
    Load the OpenPLX scene and set up the boxtruck maneuvering system.
    """

    initialize_scene_decorator()

    # Get the current script directory and load the OpenPLX scene
    file_dir = os.path.dirname(os.path.abspath(__file__))
    result = application().loadOpenPlxFile(os.path.join(file_dir, "boxtruck.openplx"), root())
    openplx_scene = result.scene()

    # Retrieve motor input objects from the scene
    assert(front_left_motor_velocity_input := openplx_scene.getObject(
        "boxTruck.front_left_drive_motor.target_angular_velocity_input"))
    assert(front_right_motor_velocity_input := openplx_scene.getObject(
        "boxTruck.front_right_drive_motor.target_angular_velocity_input"))


    # Initialize boxtruck maneuvering and set up input listeners
    boxtruck_maneuvering = BoxTruckManeuvering(result.getInputSignalQueue(), front_left_motor_velocity_input,
                                     front_right_motor_velocity_input)
    boxtruck_maneuvering.setup_keyboard_listener()

if __name__ == "__main__":
    init = init_app(
        name="__main__",
        scenes=[(buildScene, "1")],
        autoStepping=True)
After writing the script, you can run it with:
python boxtruck.py
Running this script allows you to control the truck using the up and down arrow keys.
Step 12: Add Visuals
Lastly, add visual components to the truck and ground to enhance the simulation’s appearance. Use the visuals attached to this tutorial to turn your boxtruck into an actual truck:
- Visual meshes:
chassis.obj,wheel.obj,ground.obj. - Visual textures:
chassis.png,wheel.png,ground.png.
The files listed are available under data/openplx/tutorial/t01-boxtruck in your AGX installation.
Add an offset to the chassis visuals to position it in the right spot, and modify the chassis and wheel geometry to match the visuals.
Chassis:
const ChassisVisualMaterial is Visuals.Materials.TextureMaterial:
    path: $"{AGX_DATA_DIR}/models/openplx/Chassis.png"

Chassis is Physics3D.Bodies.RigidBody:
    visual is Visuals.Geometries.ExternalTriMeshGeometry:
        path: @"chassis.obj"
        material: ChassisVisualMaterial
        local_transform.position: { 0, 0, -0.72 } # Offset the visual to match the collision geometry

    geometry is Physics3D.Geometries.Box:
        size:
            x: 3.25
            y: 1.2
            z: 1.5
    inertia.mass: 1000

    #...MateConnectors...
Wheel:
const WheelVisualMaterial is Visuals.Materials.TextureMaterial:
    path: $"{AGX_DATA_DIR}/models/openplx/Wheel.png"

Wheel is Physics3D.Bodies.RigidBody:
    visual is Visuals.Geometries.ExternalTriMeshGeometry:
        path: @"wheel.obj"
        material: WheelVisualMaterial
    geometry is Physics3D.Geometries.Cylinder:
        radius: 0.32
        height: 0.25
        material: WheelMaterial  # Use wheel contact material
    inertia.mass: 10

    #...MateConnector...
Ground:
const GroundVisualMaterial is Visuals.Materials.TextureMaterial:
    path: $"{AGX_DATA_DIR}/models/openplx/Ground.png"
    repeat: true
    scale_u: 1
    scale_v: 1

GroundPlane is Physics3D.Bodies.RigidBody:
    visual is Visuals.Geometries.ExternalTriMeshGeometry:
        path: @"ground.obj"
        material: GroundVisualMaterial
    geometry is Physics3D.Geometries.Box:
        size:
            x: 100
            y: 100
            z: 0.1
    is_dynamic: false  # Ground plane is static
To show or hide collision geometries, press G.
This completes your Boxtruck tutorial.

In following tutorials, you will learn to
- Import collision geometries and visual meshes using AGX or URDF formats
- Add steering functionality for more dynamic control
- Implement a realistic drivetrain to enhance simulation behavior
- Add tracks for complex vehicle mobility
- Integrate a shovel and simulate deformable terrain for advanced interactions
- Explore complex physics and utilize the vehicle bundle for streamlined setup