OpenPLX Tutorial 07 — Signal Interface
This tutorial will show you the basics of setting up a signal interface in OpenPLX, and how to use it to send and receive signals in python.
A Physics.Signals.SignalInterface in OpenPLX is a tool for managing simulation signals more effectively. In complex scenes, signal paths can become deeply nested and have long names, especially when located deep within the model hierarchy. A SignalInterface helps simplify this by allowing you to:
- Collect all relevant signals in one central place.
- Assign short, user-friendly aliases to these signals.
- Make the code cleaner and easier to maintain.
This is especially useful when working with control systems or interacting with external scripts that need to access multiple signals.
Creating a signal interface
For simplicity, we will reuse the boxtruck tutorial scene and add some signals to it and then use those in our signal interface. If you have not looked at tutorial 1, with the boxtruck, do so before this to get and understanding of what the scene we are using looks like and how it was set up.
We start with inheriting from the boxtruck and creating a new BoxTruckWithSignals. You need to copy the boxtruck openPLX code into a new file first from tutorials/t01-boxtruck/boxtruck.openplx. Name the new file boxtruck_with_signal_interface.openplx. You will also need the png and obj files that are used in the tutorials/t01-boxtruck-folder (chassies.png, chassies.obj, ground.png, ground.obj, wheel.png, wheel.obj).
We want to know the position of the front of the truck, so let's add a mate connector to the BoxTruckWithSignals that we can use to keep track of that position. Then we also want some signals related to that mate connector. For example, position, velocity at that position and acceleration could be interesting. For mate connectors, signals are not created automatically, as for example the motors, so we have to create them.
    chassis:
        position_observer is Physics3D.Interactions.MateConnector:
            position: {-3.25*0.5, 0.0, 0.0}

    pos_output is Physics3D.Signals.MateConnector.PositionOutput:
        source: chassis.position_observer
    vel_output is Physics3D.Signals.MateConnector.LinearVelocity3DOutput:
        source: chassis.position_observer
    acc_output is Physics3D.Signals.MateConnector.Acceleration3DOutput:
        source: chassis.position_observer
Now we have quite a few signals, so to keep track of them all we create our signal interface in the BoxTruckWithSignals. We can now give the signals aliases to make them easier to find. We do not really need signals for both of the wheels right now, so we will only add the signals from one side to the signal interface. Note that we do not need to enable the output signals, like we would have to do otherwise. Output signals added to the signal interface are automatically enabled if enable in the signal interface is set to true.
    signal_interface is Physics.Signals.SignalInterface:
        enable: true

        left_wheel_angular_vel is Physics.Signals.Output: front_left_hinge_joint.angular_velocity_output
        left_motor_torque is Physics.Signals.Output: front_left_drive_motor.torque_output

        car_front_position is Physics.Signals.Output: pos_output
        car_velocity is Physics.Signals.Output: vel_output
        car_acceleration is Physics.Signals.Output: acc_output

        left_wheel_angular_vel_input is Physics.Signals.Input: front_left_drive_motor.target_angular_velocity_input
        right_wheel_angular_vel_input is Physics.Signals.Input: front_right_drive_motor.target_angular_velocity_input
Lastly, we need to make sure we use our new BoxTruckWithSignals by updating the original Scene from the boxtruck tutorial to be:
Scene is Physics3D.System:
    boxTruck is BoxTruckWithSignals
    ground is GroundPlane  # Ground plane for truck to drive on

    wheel_ground_friction is WheelGroundFrictionModel  # Add friction model to truck
Reading signals from signal interface
Now, all that is left is to make use of our signals in python. We will reuse some parts of the python script from the boxtruck example and highlight the differences. We start with the BoxTruckManeuvering class, which is responsible for sending signals to the boxtruck.
We don't need the individual signals to be sent into the class anymore, instead we send in the signal interface. The signal interface can be accessed through the load results from when we load the openPLX-file:
signal_interface = openplx_scene.getObject("boxTruck.signal_interface")
To then access the input signals, we can now simply do:
inputs = signal_interface.getInputs()
The init of the class will then become:
class BoxTruckManeuvering:
    def __init__(
        self,
        input_queue,
        signal_interface
    ):
        """
        Initialize the boxtruck maneuvering class with input signals for motor control.

        :param input_queue: Queue to send signals to the simulation
        :param signal_interface: The signal interface keeping track of our signals
        """
        super().__init__()
        self.input_queue = input_queue
        self.inputs = signal_interface.getInputs()

        self.target_velocity = 0  # Default target velocity
        self.amplitude = 3  # Speed amplitude for the motors
And to send the signals, we now can access the signals from self.inputs and use their given name in the signal interface. For example, for the left motor velocity input, this will be:
self.inputs["left_wheel_angular_vel_input"]
Then the full send_signals-method in the BoxTruckManeuvering-class will look like this:
    def send_signals(self):
        """
        Send motor velocity signals to the input queue.
        """
        # Speed signal for the left motor
        self.input_queue.send(
            RealInputSignal.create(
                self.target_velocity, self.inputs["left_wheel_angular_vel_input"]
            )
        )
        # Speed signal for the right motor
        self.input_queue.send(
            RealInputSignal.create(
                self.target_velocity, self.inputs["right_wheel_angular_vel_input"]
            )
        )
The rest of the BoxTruckManeuvering class can then be exactly the same as for the boxtruck-tutorial.
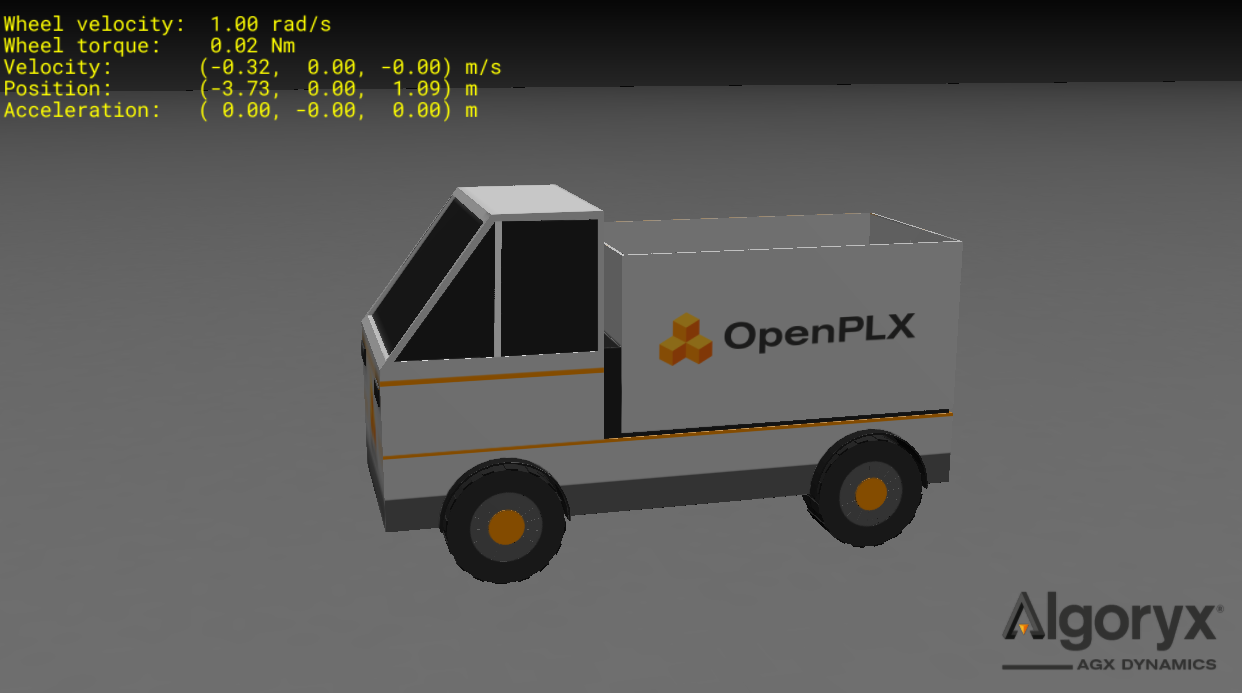
Now we also want to create a class to display our outputs. We choose to print the values on the agxViewer-window. To access our output values, we need to get the signals from the output queue. We can use the signal interface to get the signals defined in it from the output queue:
output_values = output_queue.getSignalsForInterface(signal_interface)
The output queue is the one you would access using result.getOutputSignalQueue(), where the result in this case is the load result from loading the openplx-file.
Using these output values that contain our output signals, it is now easier to access the signal values, as long as they are in the signal interface we created. We access an output signal using the name we set in the signal interface, and can then convert it to a value using, for example, .as_vec3() for a vec3-signal. It will look like this for the car_velocity-signal:
velocity = output_values["car_velocity"].as_vec3()
The full class for reading and displaying our outputs will look like this:
class DisplayOutputs(agxSDK.StepEventListener):
    def __init__(self, output_queue, signal_interface):
        """
        Initialize class for displaying outputs in the scene.

        :param output_queue: Queue to get signals from the simulation
        :param signal_interface: The signal interface keeping track of our signals
        """
        super().__init__()
        self.signal_interface = signal_interface
        self.output_queue = output_queue
        self.color = agxRender.Color.Yellow()

    def post(self, _):
        # To get the current output values, we first have to collect them from the output queue, using
        # our signal interface.
        output_values = self.output_queue.getSignalsForInterface(self.signal_interface)

        velocity = output_values["car_velocity"].as_vec3()
        pos = output_values["car_front_position"].as_vec3()
        acc = output_values["car_acceleration"].as_vec3()
        wheel_vel = output_values["left_wheel_angular_vel"].as_real()
        wheel_torque = output_values["left_motor_torque"].as_real()

        # Print the value to the agxViewer-window
        sd = application().getSceneDecorator()
        sd.clearText()
        sd.setText(1, f"Wheel velocity: {wheel_vel:5.2f} rad/s", self.color)
        sd.setText(2, f"Wheel torque:   {wheel_torque:5.2f} Nm", self.color)
        sd.setText(3, f"Velocity:       ({velocity.x():5.2f}, {velocity.y():5.2f}, {velocity.z():5.2f} m/s", self.color)
        sd.setText(4, f"Position:       ({pos.x():5.2f}, {pos.y():5.2f}, {pos.z():5.2f}) m", self.color)
        sd.setText(5, f"Acceleration:   ({acc.x():5.2f}, {acc.y():5.2f}, {acc.z():5.2f}) m", self.color)
Finally, we need to set up the scene, load the openplx-file into a simulation and add the BoxTruckManeuvering and DisplayOutputs classes.
def buildScene():
    initialize_scene_decorator()

    # Get the current script directory and load the OpenPLX scene
    file_dir = os.path.dirname(os.path.abspath(__file__))
    result = application().loadOpenPlxFile(
        os.path.join(file_dir, "boxtruck_with_signal_interface.openplx"), root()
    )
    openplx_scene = result.scene()

    signal_interface = openplx_scene.getObject("boxTruck.signal_interface")

    # Initialize boxtruck maneuvering and set up input listeners
    boxtruck_maneuvering = BoxTruckManeuvering(
        result.getInputSignalQueue(),
        signal_interface
    )
    boxtruck_maneuvering.setup_keyboard_listener()

    # Add a listener that prints outputs to the window
    simulation().add(DisplayOutputs(result.getOutputSignalQueue(), signal_interface))

init = init_app(name="__main__", scenes=[(buildScene, "1")], autoStepping=True)