6. Building your first application
AGX utilizes CMake for setting up a portable build environment. In the directory tutorials, there is a sample CMakeLists.txt which can be used as a template for building applications based on AGX. This chapter explains how to build the tutorials from a binary release of AGX on various platforms. It describes how to setup the include and library paths and which libraries are necessary to build an application based on AGX. First, make sure you have the correct libraries for your target platform (32/64 bit).
6.1. Setting up a runtime environment
Note
To be able to execute an application using AGX Dynamics you need make sure you have the correct setup environment variables set. The AGX Dynamics runtime directories are not added to the PATH by default.
The AGX Dynamics installation comes with script/bat files for setting up the runtime environment. In Windows the file is named setup_env.bat and in Linux/Mac: setup_env.bash. These setup files will initialize environment variables needed for AGX Dynamics to run properly, including PATH, AGX_FILE_PATH etc.
6.1.1. Windows
For the Windows platform there are a few ways of getting a correct environment:
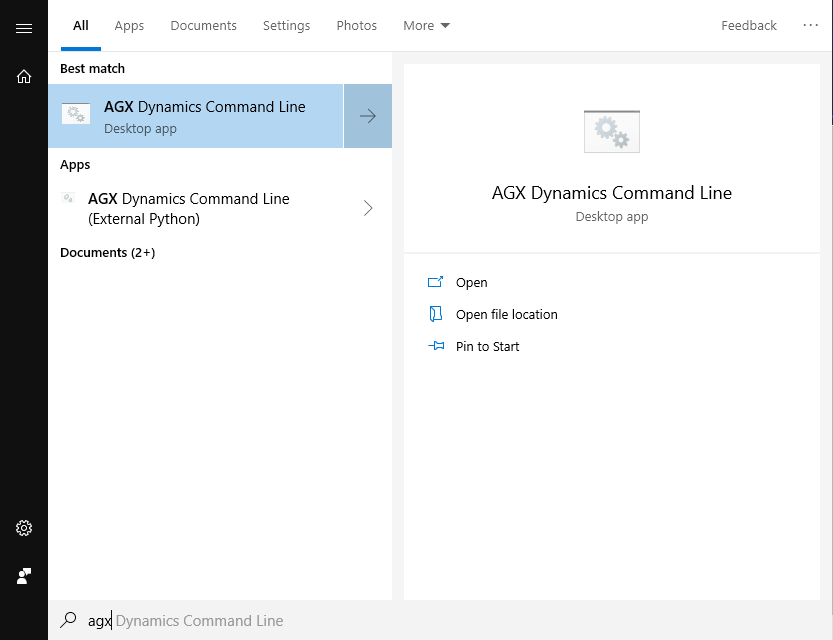
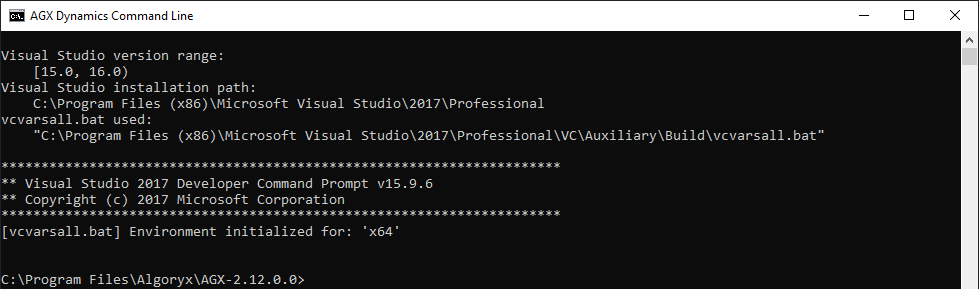
In the START menu, there is a AGX Dynamics Command line shortcut. This will open up a cmd prompt with the correct setup. By default it will utilize the internal Python interpretator. See Section 43 for more information on how to use a pre-installed Python together with AGX Dynamics.
If you want to start an application such as Matlab, Unreal Editor or Unity with a correct environment for AGX Dynamics, you can use the agx_cmd.bat which is located in the AGX install directory. The example below will properly initialize AGX Dynamics environment and start the specified application.
"c:\Users\username\AppData\Local\Algoryx\AGX-2.30.0.0\agx_cmd" "c:\Program Files\Unity\Hub\Editor\2019.3.5f1\Editor\Unity.exe"
6.1.2. Linux
To setup a working environment for the Linux platform you need to execute the script setup_env.bash that comes with the AGX Dynamics installation. You will find this in the installation directory.
$ /opt/Algoryx/AGX-2.30.0.0/setup_env.bash
$ agxViewer data/python/cables.agxPy
6.2. Windows/Visual Studio
AGX for the Windows platform is built using Visual Studio with runtime libraries from MultiThreaded DLL (MultiThreaded Debug DLL in the debug version). When you build your application, it is also important to link to the correct version of the libraries (debug/release), as it is not recommended to mix the two in the same application. AGX for windows is delivered with both debug and release libraries (see below).
Attention
By default, the installer will install AGX Dynamics into a user directory, c:UsersusernameAppDataLocalAlgoryxAGX-2.30.0.0. This results in that you can change/add/remove files from the installation directory as you like. If you choose to install AGX Dynamics into another folder, for example c:\program files\Algoryx\ you might need to have administrative rights to change files in the folder. The below instructions assume you have full accessright to the AGX Dynamics installation path.
When building the tutorials which come with AGX, the following steps have to be followed to build in-source (in the installation folder):
Install cmake (https://cmake.org) Make sure you have CMake in your PATH (there might be an option for that during the installation).
Start an AGX Dynamics Command Line: Press the START button and type AGX (and it should appear if you are running Windows 10)
Create an empty directory somewhere on the disk and make it the current directory.
Change current directory to the empty directory
Execute the command cmake-gui (make sure you have CMake in your path) and supply the AGX installation directory as an argument:
cmake-gui %AGX_DIR%Press configure and select the correct generator (VS2013, VS2015, VS2017; 32/64 bit etc.) that matches your installed AGX Dynamics binary distribution. If not, you will get linking or runtime problems.
Change CMAKE_INSTALL_PREFIX to “.” (just the dot).
Press Generate and close cmake-gui.
Start Visual Studio with environment variables from setup_env:
devenv /useenv agxBuild.slnBuild the solution
Building the project INSTALL will copy the files to the folder earlier given by CMAKE_INSTALL_PREFIX.
Now you should be able to run and debug the tutorials. Select one of them (e.g. tutorial_cable) as a StartUp-project by right-clicking on it in the solution explorer, and choosing “set as StartUp-project”.
Run externally with ctrl-F5, or debug it with F5.
Additional options can be passed via right-click in solution explorer – properties – debugging – Command arguments. One option would be –startPaused in order to start the simulation in paused state (press ‘E’ to toggle paused state while running).
Below is a session where the tutorials are prepared for building:
First, start a cmd window with the AGX Dynamics environment setup. You can either start your own cmd window and execute the setup_env.bat that exists in the AGX installation path. Or you can start one from the START menu:
Which of the two you choose, depends whether you want to use the embedded Python environment that comes with AGX, or your own (version compatible) Python installation.
c:\Program Files\Algoryx\AGX-2.12.0.0> mkdir d:\temp\buildAGXTutorials
c:\Program Files\Algoryx\AGX-2.12.0.0> pushd d:\temp\buildAGXTutorials
d:\temp\buildAGXTutorials> cmake-gui %AGX_DIR%
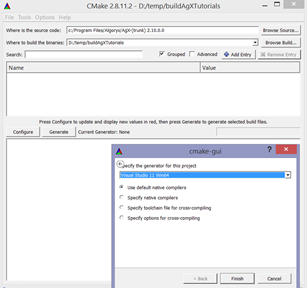
Fig. 6.1 Press Configure and select generator
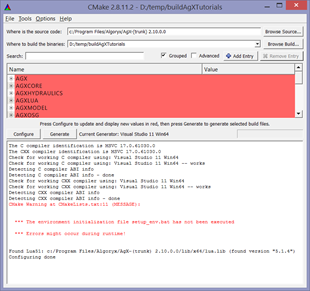
Fig. 6.2 Warnings might occur if setup_env.bat is not executed.
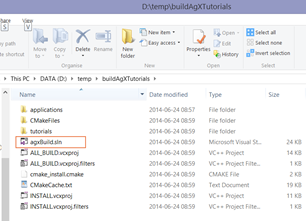
Fig. 6.3 agxBuild.sln is the resulting solution file.
d:\temp\buildAGXTutorials>
d:\temp\buildAGXTutorials>dir Release\tutorial_bodies.exe
d:\temp\buildAGXTutorials>Release\tutorial_bodies.exe
d:\temp\buildAGXTutorials>set PATH=%PATH%;c:\Program Files\Algoryx\AGX-2.12.0.0\bin\x64
d:\temp\buildAGXTutorials>Release\tutorial_bodies.exe

d:\temp\buildAGXTutorials>Release\tutorial_basicSimulation.exe
      AGX Library 64Bit AGX-2.12.0.0 Algoryx(C)
      Basic simulation tutorial
      --------------------------------


Creating a simulation
Creating a body
Adding body to the simulation
Step system 3 seconds forward in time
Shutting down AGX

d:\temp\buildAGXTutorials>
If an AGX Dynamics application is started without the correct path you might get an error message regarding missing runtime libraries:
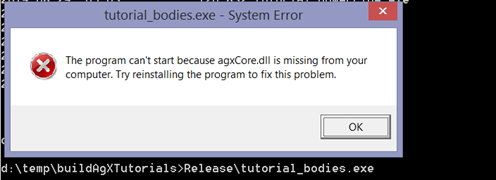
Fig. 6.4 Starting an AGX application without correct PATH.
6.2.1. Building your own code
The CMakeLists.txt supplied with AGX Dynamics can be used for your own project. Just follow the instructions for building the tutorials, but first copy the <agx-install-directory>\CMakeLists.txt to your project and modify the line where the path to AGX is specified:
Change the line:
SET(AGX_INSTALL_DIRECTORY ${agxBuild_SOURCE_DIR})
to (obviously it should reflect the path to where AGX is installed):
SET(AGX_INSTALL_DIRECTORY "C:/Program Files/Algoryx/AGX-2.12.0.0"
Then modify the rest of the CMakeLists.txt to reflect your project. This should give you an overview of how to incorporate AGX into your own build system using CMake.
6.2.2. Compiling (without CMake)
If you want to build an application without using the CMake build tool you need to specify a few pre-processor directives:
Path to AGX headers and dependencies (usually <agx-install-dir>/include)
Make sure that the WIN32 macro is defined: /D WIN32
The header file <agx/config.h> contains various settings that were used when AGX was built.
For Visual Studio you need to specify the include path to where the AGX headers are. Select your project and go to Project->Properties (Alt+F7). Specify the path to the include directory of AGX:
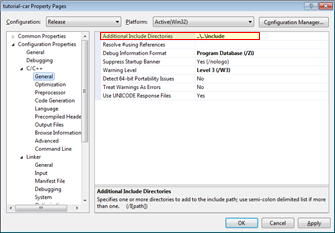
Fig. 6.5 Specify include path for AGX.
6.2.3. Linking (without CMake)
First you need to specify the path to where the libraries can be found. Make sure you choose the correct platform (x86/x64):
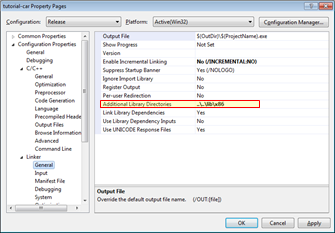
Fig. 6.6 Specify library path.
To be able to link an application to AGX you will at least need the following libraries: agxSabre.lib, agxCore.lib and agxPhysics.lib. The tutorials also require agxOSG.lib, and osg.lib, osgViewer.lib, osgDB.lib (OpenSceneGraph for rendering). Debug version of the libraries has a suffix ‘d’, for example agxSabred.lib. Additional functionality might require additional libraries. Such as Hydraulics, TireModel etc.
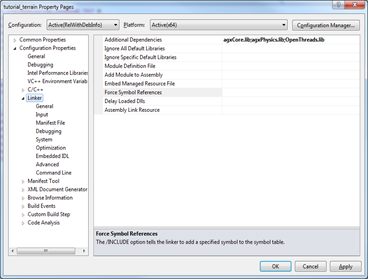
Fig. 6.7 Specifying AGX libraries.
6.3. Linux/gcc
To build the tutorials from source code, you need a compiler, development headers and optionally CMake.
The names for required and optional packages depends on which Linux distribution that is used. The lists here are for Ubuntu 20.04 and should be adapted to the Linux distribution/version you are using.
6.3.1. Tools for building AGX Tutorials or own applications
Package name |
Purpose |
|---|---|
build-essential |
Required. Compiler related dependencies. |
cmake |
Recommended. Simplify generation of project/build files |
cmake-curses-gui |
Optional |
cmake-qt-gui |
Optional |
ninja-build |
Optional. Alternative to make |
clang |
Optional. Alternative compiler instead of GCC |
6.3.2. Libraries for building/running AGX binaries
The AGX package bundles some dependencies and expects some to exist with the operating system. Note that some Linux distributions have separate packages for the shared library and the header files needed to compile and use said library.
Buildtime requirements:
Package name |
Purpose |
|---|---|
libgl-dev |
OpenGL Development files |
libglu-dev |
OpenGL Development files |
Runtime requirements:
Package name |
Purpose |
|---|---|
libglu1-mesa |
OpenGL Releated |
libssl1.1 |
Needed for websockets. Some earlier Ubuntu versions use libssl1.0.0 |
libpython3.8 |
Needed for python support. Use libpython3.6 instead on Ubuntu-18.04. |
ttf-mscorefonts-installer |
Recommended. Needed for in-application text to render properly. |
6.3.3. Building tutorials
# create an empty directory
%mkdir /tmp/agxBuild
%cd /tmp/agxBuild
# Configure cmake and create makefiles for the tutorials etc.
%cmake --DCMAKE_INSTALL_PREFIX /tmp/agxBuild /usr/home/agx-1.10.0
# Now run make using the created makefiles.
%make
6.4. Executing an AGX application
To be able to run an application build with AGX, you need to specify the path to the runtime libraries. See the documentation for your specific platform.
You also need to specify where the plug-ins and resource files, including the license file are located. This can either be done using environment variables (see Section 46), or through the API (see chapter 0) for more details.
Part of AGX is built as modules, loaded during runtime. The path to these modules must be setup before a call to agx::init() (which loads the plug-ins). Modules are also xml files, so both the RUNTIME_PATH as well as the RESOURCE_PATH have to be set to include the path to the module directory (usually placed in the bin directory of the AGX distribution).
#1 Specify the path to the plugin resource files (you are free to use ‘\’ or ‘/’).
std::string pathToAGX = "c:\Program Files\Algoryx\AGX-2.21.1.2\";
agxIO::Environment::instance().getFilePath(
      agxIO::Environment::RESOURCE_PATH).push_back(pathToAGX+"/bin/x64/plugins");
#2 Specify the path for the runtime libraries/plugins:
agxIO::Environment::instance().getFilePath(
      agxIO::Environment::RUNTIME_PATH).push_back(pathToAGX+"/bin/x64/plugins");
#3 Specify the path to data files (.cfg, .schema, etc.)
agxIO::Environment::instance().getFilePath(
      agxIO::Environment::RESOURCE_PATH).push_back(pathToAGX+"/data");
You also need to make sure that the license file (agx.lic) exists in one of the directories specified for the RESOURCE_PATH.
6.4.1. Windows registry
For the Windows operating system, registry entries will be added by the AGX installer. These registry entries will be used whenever an AGX based application is executed. This only works if AGX is installed via the installer binaries, not when it is built from source.
6.4.2. Hello world
Below is a small example that demonstrates how to properly initialize AGX and create a simulation with one body.
#include <agxSDK/Simulation.h>
#include <agx/RigidBody.h>

int main()
{
  // Where AGX is placed/installed:
  std::string pathToAGX = "c:\\Program Files\\Algoryx\\AGX-2.21.1.2\\";

  // Probably where the license file is
  agxIO::Environment::instance()->getFilePath(
    agxIO::Environment::RESOURCE_PATH).pushbackPath(pathToAGX);

  // Text files for plugins
  agxIO::Environment::instance()->getFilePath(
    agxIO::Environment::RESOURCE_PATH).addFilePath(pathToAGX);

  // binary plugin files
  agxIO::Environment::instance()->getFilePath(
    agxIO::Environment::RUNTIME_PATH).addFilePath(pathToAGX + "/bin/x64/plugins");

  // resource files
  agxIO::Environment::instance()->getFilePath(
    agxIO::Environment::RESOURCE_PATH).addFilePath(pathToAGX + "/data");

  // AutoInit will call agx::init() which must be called before
  // using the AGX API creating resources such as bodies, geometries etc.
  agx::AutoInit init;
  {
    // Create a Simulation which holds the DynamicsSystem and Space.
    agxSDK::SimulationRef sim = new agxSDK::Simulation;

    // Create a rigid body (no geometry) with default mass etc.
    agx::RigidBodyRef body = new agx::RigidBody;

    // Add the body to the simulation.
    sim->add(body);

    // Simulate for 2 seconds
    // The Time step (dt) is determined by the so called TimeGovernour.
    // Changing the time step:
    sim->getDynamicsSystem()->getTimeGovernor()->setTimeStep(1.0 / 100.0);
    while (sim->getTimeStamp() < 2.0)
      sim->stepForward();     // Take one time step.
  }

  // The destructor for AutoInit will call agx::shutdown() automatically.
  // Unloads plugins, destroys threads etc.

  return 0;
}
6.5. Dependencies
AGX Dynamics has several dependencies built as runtime libraries (.dll in windows). Table 6.1 below list the required runtime libraries for executing an application linked against AGX Dynamics under the Windows platform. Depending on which modules are used, more dll-files might be required.
RUNTIME LIBRARY |
DESCRIPTION |
|---|---|
AGXCORE.DLL |
AGX Dynamics core library |
AGXPHYSICS.DLL |
AGX Dynamics core physics library |
AGXSABRE.DLL |
AGX Dynamics sparse blocked solver |
COLAMD.DLL |
Approximate minimum degree column ordering algorithm |
LIBPNG.DLL |
PNG Image reader |
MSVCP140.DLL* |
Microsoft runtime libraries |
MSVCR140.DLL* |
Microsoft runtime libraries |
VCRUNTIME140.DLL* |
Microsoft runtime libraries |
ZLIB.DLL |
ZLib compression library |
LIBPNG.DLL |
PNG image library |
Table 6.1: Required runtime libraries.
Table 6.2 lists a few sample optional runtime libraries that might be used depending on the selected functionality in your application. If you use any classes from the agxModel name space, you will for example need to include the agxmodel.dll runtime library. The sample rendering framework utilizes OpenSceneGraph, which will require the files names osg*.dll. The table below is not a complete list of required runtime libraries. For a full list, please see the python script for copying a full runtime environment: Section 6.6.
RUNTIME LIBRARY |
DESCRIPTION |
|
|---|---|---|
AGXMODEL.DLL |
AGX Dynamics model library |
|
AGXOSG.DLL |
AGX Dynamics OpenSceneGraph wrapper |
|
AGXPYTHON.DLL |
AGX Dynamics Python wrapper |
|
AGXLUA.DLL |
AGX Dynamics Lua wrapper |
|
OSG*-OSG.DLL |
OpenSceneGraph runtime library |
|
OSG*-OSGDB.DLL |
OpenSceneGraph runtime library |
|
OSG*-OSGGA.DLL |
OpenSceneGraph runtime library |
|
OSG*-OSGSHADOW.DLL |
OpenSceneGraph runtime library |
|
OSG*-OSGSIM.DLL |
OpenSceneGraph runtime library |
|
OSG*-OSGTEXT.DLL |
OpenSceneGraph runtime library |
|
OSG*-OSGUTIL.DLL |
OpenSceneGraph runtime library |
|
OSG*-OSGVIEWER.DLL |
OpenSceneGraph runtime library |
Table 6.2: Optional runtime libraries.
Additionally, there is a list of data files required to run AGX Dynamics. These files contains entity and kernel descriptions. Entity is a core part of AGX and describes how data at a low level is stored and handled. Kernels describe execution units which operate on entities.
This data is located in the <agx-dir>/bin/<platform>/plugins/components.
6.6. Distributing an AGX Application
If you want to distribute a minimal runtime environment which contain AGX, you need to at least supply the following files:
All files from Table 6.1 (located in bin/x64/)
Files in bin/x64/plugins/Components/ - except for bin/x64/plugins/Components/Web
data/cfg/settings*.*
There is a python script that can help you copy all the required files for running an AGX Dynamics based application. It is located at: <agx-dir>/data/python/utilities/copy_runtimes.py
Depending on your specific use of AGX Dynamics, some of the runtime libraries will not be needed. It is up to you to choose only the ones that are required for your use.
The python script uses one argument: a non-existing directory that will be created and filled with the required runtime files. In the example below, the directory c:\temp\agx_runtimes will be created and all the required runtime files will be copied to that directory.
python c:\Users\username\AppData\Local\Algoryx\AGX-2.30.0.0\data\python\utilities\copy_runtimes.py c:\temp\agx_runtimes